

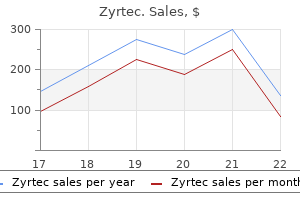
Order zyrtec master card
Studies show a 4% to 39% incidence of aspiration pneumonia in intubated patients who received activated charcoal allergy to zpack symptoms discount generic zyrtec uk. With augmentation of enterocapillary exsorption, charcoal produces sink conditions that drive diffusion of the drug from capillaries into the intraluminal space, where it is subsequently eliminated. If a cathartic is used, administer it only with the first dose of charcoal to decrease the potential risk for cathartic-induced electrolyte abnormalities, especially in children. Cathartics should be used cautiously in young children and the elderly because of the propensity for laxatives to cause fluid and electrolyte imbalance. Technique There are two types of osmotic cathartics: saccharide cathartics (sorbitol) and saline cathartics (magnesium citrate, magnesium sulfate, and sodium sulfate). The recommended dose of sorbitol is approximately 1 to 2 g/kg of body weight or 1 to 2 ml/kg of 70% sorbitol in adults and 4. The recommended dose of magnesium citrate is 250 ml of a 10% solution in an adult and 4 ml/kg body weight of a 10% solution in a child. Complications Administration of sorbitol has been associated with vomiting, abdominal cramps, nausea, diaphoresis, and transient hypotension. Be aware that multiple doses of sorbitol have been associated with volume depletion. Cathartics Background the use of cathartics is theoretically intended to decrease the absorption of substances by accelerating expulsion of the poison from the gastrointestinal tract. The mechanism of action of cathartics is such that, theoretically, it would minimize the possibility of desorption of the drug bound to activated charcoal. There is little evidence that a single dose of aqueous activated charcoal is significantly constipating; however, cathartics are often given for this potential problem. The majority of data suggest negligible clinical benefit from the use of cathartics, and the use of cathartics is not supported by the editors. Contraindications Cathartics are contraindicated in patients with volume depletion, hypotension, significant electrolyte imbalance, ingestion of a corrosive, ileus, recent bowel surgery, and intestinal obstruction or perforation. Administration of cathartics is also contraindicated in patients who do not have an intact or protected airway. The data available suggest that the large volumes of this solution needed to mechanically propel pills, drug packets (such as in body packers or stuffers), or other substances through the gastrointestinal tract are safe, including use in pregnant women and young children. It should also be avoided in patients with hemodynamic instability or an unprotected airway. Note the marked decrease in radiopaque pills (arrows) in the gastrointestinal tract. Antiemetics such as ondansetron, as well as gradually advancing the infusion rate over a 60-minute period, can help ease this side effect. The benefit is unproved, but there is little theoretical downside to this technique and it is supported by the authors. Empirically, metoclopramide (10 to 20 mg intravenously) may be coadministered to decrease nausea and facilitate gastrointestinal passage. Antiemetics and a 15- to 30-minute break followed by a slower rate may allow readministration. As discussed with the other methods of decontamination, attention should be directed to the airway and the potential for aspiration. Although many of these events involve little morbidity or mortality, hospitals must prepare for the inevitability of caring for the chemically contaminated patient. Communication with the local fire, police, and paramedic systems provides early detection of such events and allows preparation before patients arrive. Security should be arranged to prevent contaminated patients from entering the hospital, and "lockdown" of the facility should be considered. Appropriate triage should then take place, with experienced personnel performing an initial brief assessment of each patient. The triage and decontamination areas should be organized into several "zones" to prevent further contamination. The hot zone is the location with the highest level of contaminant or where the incident occurred. In most cases of hospital-based decontamination there is no hot zone because patients have been removed from the initial chemical insult. Basic lifesaving treatments, airway and hemorrhage control, antidote administration. The decontamination facility is prepared and trained individuals don personal protective equipment. A portable decontamination facility as shown here is ideal, although may not be available at many institutions. Contaminated clothing and valuables should be placed in an impervious bag to avoid potential off-gassing. Ideally, a hospital should have a permanent decontamination facility capable of handling a small number of chemically exposed patients and, in addition, a large portable unit for mass casualties. The decontamination area should meet several qualifications: (1) it should be secured to prevent spread to other areas of the hospital, (2) the ventilation system should be separate from the rest of the hospital or it should be shut off to prevent airborne spread of contaminants, and (3) provisions must be made to collect the rinse water from contaminated patients to prevent contamination of the facility and water supply. At most facilities, the best place to begin initial treatment and evaluation is outdoors. Portable decontamination facilities are available, but their cost may be prohibitive for many institutions. The first priority in decontaminating patients is to remove their clothing while both maintaining privacy and preventing hypothermia. This step is the most important in the decontamination process and can reduce a significant level of contaminant. Water irrigation has been shown to be efficacious in numerous clinical trials, it is widely available, and it is inexpensive. Starting from head to toe, exposed skin and hair should be irrigated for 10 to 15 minutes. Scrubbing with a soft surgical sponge is advocated, while being careful to not abrade the skin. Wounds should be irrigated for an additional 5 to 10 minutes with water or saline. Direct irrigation away from the medial canthus to avoid forcing contaminants into the lacrimal duct. Irrigate the nares and ear canals, with frequent suctioning if contamination is suspected. Avoid using stiff brushes and abrasives because they may enhance dermal absorption of the toxin and can produce skin lesions that may be mistaken for chemical injuries. Products that do not require rinsing constitute a new approach in cases of emergency situations with limited access to water. There are neutralizing products already deployed in various militaries for this exact purpose. It is a water miscible lotion, distributed as a sealed pack containing a single-use pad. This product has been shown to neutralize many chemical warfare agents and toxic industrial chemicals. Neutralizing products have been shown to be superior to traditional decontamination methods in head-to-head trials. Transfer patients with major or moderate injuries to areas designated for such cases. Send patients with minor or no injuries to appropriate holding areas for further evaluation. Medical care at this stage depends on the toxin to which the patient has been exposed and the potential toxicity of that agent. Wounds, after copious irrigation, may need thorough exploration and possibly surgical removal of the contaminant. Train staff in the procedures and protocols, establish communication between community agencies and hospitals, regularly inspect equipment, and rehearse setups.
Syndromes
- Reactions to medicines
- Diarrhea
- Frequent or urgent urination
- Senna
- Chest pain
- Magnetic resonance angiography to look at the blood vessels in the neck and brain
Cheap zyrtec generic
However allergy medicine 7 year program buy zyrtec 5mg low cost, in 1991, Abd-El-Maeboud and colleagues found that inserting suppositories blunt end first resulted in greater retention within the rectum and a lower expulsion rate. The goal is to deposit the drug in the low to mid-portion of the rectum to avoid first-pass elimination by the liver. When administering rectal medication to infants and young children, be sure to squeeze the buttock cheeks closed after withdrawing the catheter to Medications A variety of medications can be administered rectally. In emergency medicine practice the most common medications given rectally are analgesics and antipyretics, sedative-hypnotic agents, anticonvulsants, antiemetics, and cation exchange resins. Analgesics and Antipyretics Acetaminophen is frequently administered rectally in children for both fever and pain. Common reasons for rectal administration include refusal to take the medication orally, vomiting, and altered mental status. Acetaminophen is commercially available in suppository form and is easy to obtain and administer. Studies comparing oral and rectal administration of acetaminophen have demonstrated equal antipyretic effectiveness. For example, aspirin is commonly administered rectally to adults with symptoms of a transient ischemic attack, an acute stroke, or an acute coronary syndrome who may have an impaired swallowing mechanism or are too unstable to take medication orally. Like acetaminophen, the oral and rectal doses of aspirin are similar (see Table 26. Rectal administration of methohexital and thiopental is particularly useful for non-painful procedures such as sedating children before advanced imaging studies. To prepare a solution of methohexital for rectal administration, add 5 mL of sterile water or saline to a 500-mg vial of methohexital and mix well; this provides a methohexital solution of 100 mg/mL. Diazepam is commercially available in a gel formulation that is preloaded in a rectal delivery system (Diastat AcuDial). The preloaded rectal delivery system is available for both pediatric and adult use. The adult device contains 4 mL (20 mg) of diazepam gel and has a 6-cm tip for rectal administration. The recommended dose of diazepam rectal gel for treating actively seizing children and those in status epilepticus is 0. Prochlorperazine requires a higher dose when given rectally, whereas promethazine dosing is the same regardless of the route of administration (see Table 26. Cation Exchange Resin the most commonly available cation exchange resin is sodium polystyrene sulfonate (Kayexalate). Each gram of resin may bind as much as 1 mEq of potassium and release 1 to 2 mEq of sodium. Sodium polystyrene sulfonate may be given orally or rectally as a retention enema. Common reasons for rectal administration include an inability or refusal to swallow (the oral solution is not very palatable), vomiting, and altered mental status. The resin comes in two forms: a powder that must be reconstituted and a premixed suspension containing sorbitol. Prepare a sodium polystyrene sulfonate enema by dissolving 50 g of the resin in 100 to 150 mL of tap water warmed to body temperature. In adults, administer the resin emulsion via a 6- or 8-Fr rubber feeding tube placed approxi- mately 20 cm from the rectum with the tip well into the sigmoid colon. Retain the enema in the colon for at least 30 to 60 minutes and for several hours if possible. The recommended dose of sodium polystyrene sulfonate for rectal administration in adults is 30 to 50 g every 6 hours. One may also calculate the dosage in neonates based on the exchange ratio of 1 mEq K+/g of resin (see Table 26. Complications Complications specific to rectal administration include erratic absorption and local trauma. Absorption of a rectally administered drug may be delayed or prolonged, or uptake may be almost as rapid as though the agent were administered intravenously. These factors make rectal drug administration less desirable in most cases when parenteral administration is possible. Insertion of a suppository or catheter into the rectum may cause mild pain and mucosal irritation, which is usually well tolerated by most patients. Similarly, bleeding from local trauma is usually of no clinical consequence, except in patients with a clinically significant coagulopathy or severe thrombocytopenia. Historically, hypodermoclysis in humans was used in the elderly in non-emergency situations for rehydration. This transiently increases permeability of the connective tissue matrix, allowing movement of subcutaneously administered fluids (and medications) into the surrounding tissues, with subsequent systemic absorption via the capillary beds. Pinching the skin between fingers, insert a 21-gauge (or smaller) needle, bevel up, into subcutaneous tissue at a 45- to 60-degree angle. Administer 150 units of human recombinant hyaluronidase into the subcutaneous space. Manisterski Y, Vanknin Z, Ben-Abraham R, et al: Endotracheal epinephrine: a call for larger doses. Naganobu K, Hasebe Y, uchiyama Y, et al: A comparison of distilled water and normal saline as diluents for endobronchial administration of epinephrine in the dog. Mazkereth R, Paret D, Ezra G, et al: Epinephrine blood concentrations after peripheral bronchial versus endotracheal administration of epinephrine in dogs. Tandberg D, Abercrombie D: Treatment of heroin overdose with endotracheal naloxone. Efrati O, Barak A, Ben-Abrahan R, et al: Should vasopressin replace adrenaline for endotracheal drug administration Chiaretti A, Barone G, Rigante D, et al: Intranasal lidocaine and midazolam for procedural sedation in children. Miller J, Xue B, Hossain M, et al: Comparison of dexmedetomidine and chloral hydrate sedation for transthoracic echocardiography in infants and toddlers: a randomized clinical trial. Prommer E, Thompson L: Intranasal fentanyl for pain control: current status with a focus on patient considerations. Foster D, upton R, Christrup L, et al: Pharmacokinetics and pharmacodynamics of intranasal versus intravenous fentanyl in patients with pain after oral surgery. Borland M, Jacobs I, King B, et al: A randomized controlled trial comparing intranasal fentanyl to intravenous morphine for managing acute pain in children in the emergency department. Yeaman F, Oakley E, Meek R, et al: Sub-dissociative dose intranasal ketamine for limb injury pain in children in the emergency department: a pilot study. Andolfatto G, Willman E, Joo D, et al: Intranasal ketamine for analgesia in the emergency department: a prospective observational series. Kofler J, Sterz S, Hofbauer R, et al: Epinephrine application via an endotracheal airway and via the Combitube in esophageal position. Westin uE, Bostrom E, Grasio J, et al: Direct nose-to-brain transfer of morphine after nasal administration to rats. Pires A, Fortuna A, Alves G, et al: Intranasal drug delivery: how, why and what for Bhattacharyya M, Kalra V, Gulati S: Intranasal midazolam vs rectal diazepam in acute childhood seizures. Brigo F, Nardone R, Tezzon F, et al: Nonintravenous midazolam versus intravenous or rectal diazepam for the treatment of early status epilepticus: A systematic review with meta-analysis. Arya R, Kothari H, Zhang Z, et al: Efficacy of nonvenous medications for acute convulsive seizures: A network meta-analysis. Lyons N, Nejak D, Lomotan N, et al: An alternative for rapid administration of medication and fluids in the emergency setting using a novel device. Bradshaw A, Price L: Rectal suppository insertion: the reliability of the evidence as a basis for nursing practice. Achariyapota V, Titapant V: Relieving perineal pain after perineorrhaphy by diclofenac rectal suppositories: a randomized double-blinded placebo controlled trial. Dhawan N, Das S, Kiran u, et al: Effect of rectal diclofenac in reducing postoperative pain and rescue analgesia requirement after cardiac surgery. As the procedure requires familiarity with the equipment, continuing education, and quality control, it would be counterproductive to institute the procedure in a hospital that has a low trauma census or in a setting in which it will be used infrequently enough that staff education issues are problematic. During the 1960s and 1970s, cardiopulmonary bypass surgery and combat trauma experience during the Vietnam War generated extensive data regarding intraoperative retrieval of large quantities of blood for reinfusion. The blood is normothermic and compatible, which avoids the risk of allergic reaction or infection from transfusion transmissible diseases. Despite its retrospective design, this study offers support for the practice of autotransfusion based on patient-oriented outcomes.
Zyrtec 5mg for sale
Throughout history allergy medicine ragweed buy 10 mg zyrtec with amex, treatment of this condition has been the focus of ongoing discussion and debate. Patients often have large reducible hernias for years and are able to reduce them easily, but such hernias can also become strangulated or incarcerated. An incarcerated hernia is one whose contents are not reducible without surgical intervention. A strangulated hernia is an incarcerated hernia whose blood supply to the herniated structures is compromised. A strangulated hernia is a surgical emergency because tissue ischemia and necrosis will result if adequate blood flow is not restored. A primary ventral hernia of the abdominal wall may be umbilical, epigastric, or spigelian, depending on its location. An inguinal hernia is found within the inguinal triangle, which is formed by the inguinal ligament on the inferior side, the inferior epigastric artery on the superior lateral side, and the lateral edge of the rectus abdominis muscle on the medial side. Direct and indirect inguinal hernias occur superior to the inguinal ligament, whereas a femoral hernia is located inferior to the inguinal ligament. A spigelian hernia (lateral ventral hernia) is located in the abdominal wall just lateral to the rectus abdominis muscle. Indirect Inguinal Hernia An indirect inguinal hernia passes through the internal (deep) inguinal ring and into the inguinal canal. During fetal development, the processus vaginalis allows descent of the testes into the scrotum. These occur more frequently in males and are commonly diagnosed in children and young adults. Approximately 5% of full-term infants and 30% of preterm infants will have an inguinal hernia. Asymptomatic and painless inguinal hernias can progress to cause symptoms over time if they are not surgically repaired,4 although watchful waiting may also be appropriate in some patients. Abdominal hernias are characterized by protrusion of intraabdominal contents (usually bowel or omentum) through an abnormal defect in the abdominal wall musculature. This weakness may be the result of aging and the accompanying loss of tissue elasticity, increased intraabdominal pressure, failure of proper healing, or trauma involving the abdominal wall. It is estimated that hernias develop in 5% of men and 2% of women,8,9 and that 75% of them occur in the groin. Direct Inguinal Hernia A direct inguinal hernia comes directly through the muscular and fascial wall of the abdomen. It is located medial to the inferior epigastric vessels within the inguinal triangle. These can be differentiated from indirect inguinal hernias as direct hernias do not travel along the inguinal canal. It is an acquired weakening of the myofascial wall caused by aging and the repetitive stress of increased abdominal pressure. This hernia carries a lower risk for incarceration because the hernia orifice is typically wide. B, It was not until the physician carefully examined the groin area that an incarcerated inguinal hernia was found. Symptoms of the obstruction, the impressive radiographic findings, and an incomplete physical examination led to initial failure to diagnose the obvious hernia. Inguinal ligament Superficial inguinal ring Femoral Hernia A femoral hernia occurs inferior to the inguinal ligament through a defect in the transversalis fascia. Abdominal contents protrude into the potential space medial to the femoral vein and lateral to the lacunar ligament in the femoral canal, and appear as a medial thigh mass below the area where direct and indirect hernias are typically identified. A small fascial defect leading to constriction by the inguinal ligament means that this hernia becomes incarcerated in up to 45% of cases. Pantaloon Hernia A pantaloon hernia is a combination of direct and indirect hernias. Incisional Hernia An incisional hernia may occur in as many as one out of every five patients following abdominal surgery. Patients are typically 40 to 70 years of age, but the hernia has also been reported in younger patients. Inquire about signs of infection and systemic illness, such as fever, chills, and malaise. Determine whether the patient has signs or symptoms of bowel obstruction, including nausea and vomiting. Document a record of previous surgeries and hernia repairs, including the presence of synthetic mesh. On physical examination, palpate the inguinal canal in males by inverting the scrotal skin and passing a finger into the external ring. Ask the patient to cough or perform a Valsalva maneuver, which increases intraabdominal pressure and facilitates detection of a hernia. Palpation of the external ring is more difficult in females because it is narrower. An indirect inguinal hernia is manifested as a swelling in the area of the inguinal ligament or as scrotal swelling in male patients. On examination, an indirect hernia can be differentiated from a direct hernia in several distinct ways: (1) an indirect hernia begins lateral to the inferior epigastric arteries; (2) the contents of an indirect hernia will strike the top of the finger instead of the volar pad during examination, as the hernia protrudes down the canal instead of directly across a fascial defect; (3) applying pressure over the internal ring after hernia reduction will block recurrence of the hernia during Valsalva, without impacting the bulge of a direct hernia during straining; and (4) a hernia that fills the scrotum is most likely an indirect hernia. An asymptomatic hernia may be manifested as a mass that is found incidentally on physical examination of the abdomen or groin. This is particularly important for inguinal hernias because elective repair is associated with much less morbidity than emergency repair for strangulation. Consider the possibility of an incarcerated or strangulated hernia in young children with nonspecific complaints such as vomiting, poor eating, lethargy, or irritability. Umbilical Hernia An umbilical hernia traverses the fibromuscular ring of the umbilicus. This hernia is most commonly found in infants and children, is congenital in origin, and often resolves without treatment by the age of 5. An umbilical hernia is more prone to incarceration and strangulation in an adult than in a child. Epigastric Hernia this hernia occurs in the midline through the linea alba of the rectus sheath. It is usually located in the epigastric region between the xiphoid and the umbilicus. Though previously considered rare in infants, one study found epigastric hernias in 4% of all pediatric patients evaluated for hernias. Spigelian Hernia A spigelian hernia is rare and occurs through a defect in the lateral edge of the rectus muscle at the level of the semilunar line and near the arcuate line. It is caused by a partial abdominal wall defect in the transverse abdominal Radiologic Imaging When findings on physical examination are equivocal and the emergency clinician suspects an occult hernia, several options are available for diagnostic imaging. The efferent loop of small bowel is of normal caliber; however, the afferent loop is decompressed, thus suggesting a transition point within the hernia. Diagnosis of Incarcerated Versus Strangulated Hernias When the patient or emergency care provider cannot manually reduce the contents of the hernia back into the abdominal cavity, the hernia is described as incarcerated. Although hernias are a leading cause of bowel obstruction, patients with incarcerated hernias do not necessarily have associated bowel obstruction. Incarceration is more common with femoral hernias, small indirect inguinal hernias, and ventral or incisional hernias. Incarceration can be caused by the presence of a small fascial defect, by constriction of the defect by surrounding musculature, adhesions, or by swelling of the hernia contents. A strangulated hernia is one in which the vascular supply to the herniated bowel is compromised, thus leading to ischemia. Strangulated hernias will most commonly also be incarcerated, but this is not a universal finding. In rare instances a strangulated or incarcerated hernia may inadvertently be reduced en masse to a preperitoneal location. Because the clinician believes that the hernia has been appropriately reduced, this can result in delay in the diagnosis of ischemic bowel.
Purchase zyrtec 5mg with visa
B allergy forecast spokane wa buy generic zyrtec 5 mg, A lateral view shows that the lunate remains in alignment with the end of the radius (R) but the remainder of the carpal bones have been dislocated. The head of the femur is deeply situated in the acetabulum, and liga- mentous and muscular support is very strong. Therefore hip dislocations are usually the result of significant force, and a careful search for other limb- or life-threatening injuries must be undertaken. Common mechanisms of hip dislocation include motorcycle or car accidents, vehicles striking pedestrians, and falls. A, On a posteroanterior view of the wrist, significant overlap is seen of the capitate (C) and scaphoid (S), as well as the hamate (H) and lunate (l). B, On the lateral view, the carpal bones remain in alignment with the distal end of the radius (R), but the lunate has rotated and dislocated in the palmar direction (arrow). However, the emergency clinician should be able to reduce simple hip dislocations, which are dislocations without an associated fracture or with a very minor fracture. A missed diagnosis can also occur when a fracture of the femur obscures the clinical picture of hip dislocation. Although it is generally stated that early reduction will reduce the frequency of this complication, evidence for this statement is hard to find. Yang and colleagues122 found that reduction beyond 24 hours was associated with a worse prognosis, but they could not find a significant time factor for those reduced in less than 24 hours. Nevertheless, it is still advisable to reduce hip dislocations as soon as feasible to decrease soft tissue distortion. If evidence of nerve injury exists, the dislocation should be treated as an emergency and reduced as early as possible. Posterior dislocation occurs 90% of the time and is seen here on the left, with the femoral head displaced superior and lateral to the acetabulum. On the right is an anterior dislocation with the femoral head displaced inferiorly and medially. This patient also has a fracture of the pelvis and possibly the left acetabulum and will require a computed tomography scan to unravel the extent of all injuries. A lateral or oblique view of the hip may help clarify the type of dislocation and allow detection of associated fractures. Howard127 suggested modifying this technique by applying lateral traction on the flexed upper part of the femur to disengage the head of the femur from the outer lip of the acetabulum. The left leg is shortened, abducted, flexed at the knee, and externally rotated, similar to the appearance of a hip fracture. Posterior Hip Dislocation Posterior dislocation is the most common type of hip dislocation. Posterior dislocations generally occur secondary to a blow to the flexed knee with the hip in varying degrees of flexion. The greater the amount of flexion of the hip at the time of the injury, the less the chance of an associated fracture. The sciatic nerve is located just behind the hip joint and may be injured with a posterior hip dislocation. The supine position may be preferable in multiply injured patients because of the difficulty involved in closely monitoring a critically ill patient in the prone position. With the other hand, anchor the ankle of the affected leg firmly against the stretcher. Using the arm placed under the knee as a lever, raise your shoulder to elevate the affected knee. This allows the femoral head to move anteriorly around the acetabular rim and relocate. To perform the Captain Morgan technique, place the patient supine with the affected knee flexed. One case series described an extremely high success rate with this method of reduction, with only one failed attempt secondary to bony fragments in the joint space, which required open reduction. Radiographs should be repeated to confirm reduction, and the patient should be admitted to the hospital. Dislocations of Hip Prostheses Dislocation of a hip prosthesis is a separate issue. Unlike primary dislocations, which require significant trauma, a prosthetic hip may dislocate with minimal force, such as rolling over in bed or trying to get out of a chair. Most dislocations occur in the first 3 to 4 months after surgery, but recurrent dislocation may take place much later. Flex the hip, knee, and ankle to 90 degrees and apply downward pressure on the posterior aspect of the proximal end of the tibia. Allis Technique Place the patient prone with the distal part of the pelvis overhanging the edge of the stretcher. Instruct an assistant to apply downward pressure on the anterior superior iliac spines. Captain Morgan Technique Position the patient supine with the knees flexed to 130 degrees. Instruct an assistant to stabilize the pelvis, and place your arm under the affected knee and grab the other knee. Using your arm under the knee as a lever, raise your shoulder and elevate the affected knee. The three major causes of prosthetic hip dislocations include (1) assumption of a position that exceeds the stability of the prosthesis, (2) soft tissue imbalances, and (3) component malposition. Although complications are occasionally unavoidable, the clinician must be aware that forceful reduction of a dislocated hip prosthesis may dislodge the acetabular cup, fracture underlying osteoporotic bone, or loosen the prosthesis. Unlike other hip dislocations, patients with prosthetic hip dislocations will often not require hospital admission and may be discharged after discussion with the consulting orthopedic surgeon. Anterior Hip Dislocation Anterior hip dislocations are less common than posterior dislocations and account for 10% to 15% of all hip dislocations. This posteroanterior radiograph shows left-sided dislocation, with the femoral component displaced in a superior direction. B, A cross-table lateral view demonstrates that this is a posterior dislocation (posterior is at the bottom of the image, anterior at the top). A result from forced abduction of the thigh, which may occur with a fall or motor vehicle crash. With the obturator (inferior) type, the leg is abducted and externally rotated with varying degrees of flexion. Place the patient in a supine position and have an assistant stabilize the pelvis while applying lateral countertraction on the thigh. Apply traction in the line of the deformity, and adduct, sharply internally rotate, and extend the hip. Caution should be exercised when using this technique because the sharp internal rotation may result in fracture of the femoral neck in patients with osteoporotic bone. Apply traction with external rotation to move the femoral head away from the metallic cup. B, After reduction, a knee immobilizer prevents dislocation again as hip motion is hampered. The major ligaments include the anterior and posterior cruciate and the collateral ligaments. This patient stated that she stepped into a hole and twisted her knee (a classic mechanism for dislocation), which caused the clinician to suspect only ligamentous injury or a sprain with a hemarthrosis. If spontaneous reduction occurs before evaluation in the emergency department, this diagnosis may not even be considered. Arterial injury (especially popliteal artery) is a serious complication of a knee dislocation. An arteriogram is the gold standard for evaluation of arterial injuries, which can initially be subtle or delayed. However, knee dislocation has been reported after minor mechanisms, such as stepping off a curb or into a hole, usually in association with a twisting action. These patients are more commonly women and are at increased risk of vascular injury when compared to high-energy mechanism multi-ligament disruptions. Rotatory dislocations may be anteromedial, anterolateral, posterolateral, or posteromedial. When a spontaneously reduced knee dislocation is associated with other major trauma, the diagnosis can be missed.
Cheap zyrtec 5 mg on line
Because the dislocation is directly posterior allergy forecast paris france buy cheap zyrtec, there is no superior or inferior displacement of the humeral head. On superficial observation, the head of the humerus appears to maintain a normal relationship with the glenoid fossa and the acromion process. The space between the humeral head and the glenoid fossa is abnormal, and because of the extreme internal rotation of the humerus, the head and neck are seen end on and resemble a light bulb. B, On the scapular Y view it becomes obvious that the humeral head is posteriorly dislocated. It projects posteriorly under the scapular spine rather than in its normal location, centered over the glenoid fossa. The humeral head appears as a light bulb, which indicates internal rotation and is a subtle sign that a posterior dislocation might be present (arrow). B, On the axillary view the humeral head is seen to lie posteriorly and is impacted on the rim of the glenoid (arrow). When viewing axillary films, use the coracoid process to orient yourself to anterior and posterior (the coracoid is an anterior structure). Posterior shoulder dislocation causes internal rotation of the humeral head, which makes the head appear as a light bulb rather than its normal club-shaped appearance. In addition, note that the space between the articular surface of the humeral head and the anterior glenoid rim is widened (arrows), and there is a decrease in the overlap between the head and the fossa. Inferior Dislocation (Luxatio Erecta) Apply traction, internal rotation, and adduction to the affected arm. Instruct one assistant to apply countertraction (with a sheet wrapped around the waist) and another assistant to apply anteriorly directed pressure on the posterior aspect of the humeral head. As mentioned earlier in this section, ultrasound is being used increasingly for the diagnosis of shoulder dislocations, including posterior shoulder dislocations and may be useful as an adjunct to the physical exam when dislocation is clinically suspected but not radiographically apparent. Hawkins and colleagues79 suggested that posterior dislocations with an impression defect of the humeral head greater than 20% of the articular surface require open reduction. Posterior dislocations that have been diagnosed late are difficult to reduce in a closed manner, but an attempt with adequate premedication is generally indicated. Given the rarity of these injuries, orthopedic consultation is often sought early in the care of these patients. In a training environment, involvement of orthopedic residents is of benefit to their education and should be considered early. An analysis and review of the literature of posterior dislocations suggests the majority (65%) of posterior shoulder dislocations will have an associated injury (fracture, reverse Hill-Sachs injury, or rotation cuff tear) underscoring the importance of orthopedic consultation. After reduction, bring the abducted arm into adduction against the body and supinate the forearm. To perform this maneuver, place one hand on the medial condyle of the elbow and the other hand around the shaft of the humerus. Push anteriorly on the shaft of the humerus while stabilizing the medial condyle of the elbow, and rotate the humeral head from an inferior to an anterior position. The authors then describe using the external rotation method to reduce what is now a typical anterior dislocation. The coracoclavicular ligament, which has posterior (conoid) and anterior (trapezoid) components, anchors the distal end of the clavicle to the coracoid process of the scapula and therefore supports the joint in a superior-inferior direction. Unusual Shoulder Dislocations Luxatio Erecta Inferior dislocations of the shoulder, known as luxatio erecta, are quite rare but also quite obvious. The patient has the arm locked in marked abduction with the flexed forearm lying on or behind the head82. Occasionally, the humerus may have less abduction, thus potentially obscuring the diagnosis. Associated injuries include fractures of the greater tuberosity, acromion, clavicle, coracoid process, and glenoid rim. Neurovascular compression may be present, but this is usually reversed once reduction is accomplished. A, this is a rare inferior shoulder dislocation, and patients may hold their arm in marked abduction with the elbow flexed and the forearm resting on their head. Radiographs show little, if any change in position of the clavicle in relation to the acromion. Radiographs demonstrate a definite change in the relationship of the distal end of the clavicle to the acromion. The diagnosis is generally obvious, and radiographs are used mainly to rule out an associated fracture. Radiographic criteria for this degree of injury include the inferior border of the clavicle raised above the acromion or a discrepancy in the coracoclavicular distance between the normal and affected sides. Type V injury is characterized by inferior displacement of the scapula with a marked increase (two to three times normal) in the coracoclavicular interspace. Because this is usually the result of major trauma, other fractures are often present and should be sought. Radiographs are generally indicated to rule out associated fractures and to aid in assessing the degree of injury. A, Frontal chest radiograph showing asymmetry in the position of the medial margins of the clavicle, with the right clavicle (on the injured side) being located inferior to the left clavicle. B, An axial computed tomography scan confirms posterior dislocation of the right sternoclavicular joint. Weighted films are generally performed after routine "unweighted" radiographs and are obtained by strapping approximately 4. Anterior dislocations are much more common and usually the result of an indirect mechanism involving a blow thrusting the shoulder forward,63 or they may be atraumatic, caused by ligamentous laxity in teens and young adults. The clinical manifestation of these injuries is usually straightforward and consists of pain, swelling, tenderness, and deformity of the joint. Patients may complain of pain that is worse with arm movement and when they are supine. Plain radiographs of this joint are difficult to interpret and generally include an apical lordotic-type view with the radiographic tube angled 45 degrees cephalad. Children may have epiphyseal disruption with retrosternal displacement of the medial aspect of the clavicle. Apply traction on the 90-degree abducted, 10-degree extended arm in line with the clavicle and then push (anterior dislocation) or lift (posterior dislocation) the clavicle back into position. Therefore some authors recommend reduction in an operating suite unless complications necessitate immediate reduction. Once reduced, a clavicle strap may be used to immobilize both anterior and posterior dislocations for up to 6 weeks. Because of the stability of the elbow, any dislocation is expected to be accompanied by considerable soft tissue damage. Associated fractures of the radial head and coronoid process of the ulna are common. Elbow dislocations are usually simply divided into posterior and anterior dislocations. However, there are actually several additional types of elbow dislocations, including lateral, divergent, and isolated dislocations of the radius. This injury is possible with any type of elbow dislocation and is a frequent occurrence with open dislocations. The circulatory status of the arm must be carefully monitored even after successful reduction. Injury to the median and ulnar nerves may be the result of stretch, severance, or entrapment. It is difficult to clinically distinguish these causes; therefore management of nerve injuries is frequently expectant. The patient has a shortened forearm that is held in flexion, and the olecranon is prominent posteriorly. The normally tight triangular relationship of the olecranon and the epicondyles of the distal end of the humerus is disturbed in a posterior dislocation. A careful search for fractures of the distal end of the humerus, radial head, and coronoid process must be undertaken because they commonly occur in this injury.
L. sporogenes (Bacillus Coagulans). Zyrtec.
- How does Bacillus Coagulans work?
- What is Bacillus Coagulans?
- Are there any interactions with medications?
- Are there safety concerns?
- Dosing considerations for Bacillus Coagulans.
Source: http://www.rxlist.com/script/main/art.asp?articlekey=97128
Zyrtec 10mg with mastercard
The scalpel is used to find an appropriate site; a natural plane often exists at the junction of the epidermis and dermis allergy shots for yeast discount zyrtec 10mg mastercard. A, this child sustained a superficial forehead laceration just through the epidermis. As the laceration was healing, it became red and more noticeable (as do all scars), but eventually faded. The best cosmetic result occurs when the long axis of a wound happens to be parallel to the direction of maximal skin tension; such alignment brings the edges of the wound together. Swelling after an injury creates additional tension within the circle of each suture. Tension can be reduced during wound closure in two ways: undermining of the wound edges and layered closure. The force required to reapproximate the edges of a wound correlates with the subsequent width of the scar. T undermine a wound, o the clinician frees a flap of tissue from its base at a distance from the edge of the wound approximately equal to the width of the gap that the laceration presents at its widest point. The depth of the incision can be modified, depending on the orientation of the laceration to skin tension lines and the laxity of skin in the area. The clinician can also accomplish this technique by spreading scissors in the appropriate tissue plane. Because undermining may harm the underlying blood supply, this technique should be reserved for relatively uncontaminated wounds when no other methods adequately relieve wound tension. Minimizing Tissue Trauma the importance of carefully handling tissue has been emphasized since the early days of surgery. When choosing suture size, the clinician should select the smallest size that will hold the tissues in place. Skin stitches should incorporate no more tissue than is needed to coapt the wound edges with little or no tension. Knots should be tied securely enough to approximate the edges of the wound without blanching or indenting the skin surface. Tie and bury the knot by pulling the sutures in the long axis of the wound as shown. Finally, layered closure provides support to the wound and considerably reduces tension at the skin surface. A "fat stitch" is not necessary because little support is provided by closure of the adipose layer and additional suture material may increase the possibility of infection. Layered closure is not recommended for wounds without tension, those with poor vascularity, and those with a moderate or high risk for infection. One approach is to close the length of this layer in segments by placing the first stitch in the middle of the wound and bisecting each subsequent segment until closure of the layer has been completed. Approximation of a lacerated muscle hastens healing and return of function to the muscle. A, In most situations, the needle should be loaded perpendicular to the needle driver. B, If the wound is narrow, the needle can be grasped at a slightly obtuse, 135-degree angle to the needle driver. Once the suture has been placed on one side of the wound, it can be pulled across the wound to the opposite side (or the edges of the wound pushed together) to determine the matching point on the opposite side. The needle should enter the dermis at the same depth as it exited from the opposite side, pass through the tissue, and exit at the bottom of the wound (or the base of the flap). The edges of the wound can be closely apposed by pulling the two tails of the suture in the same direction along the axis of the wound. Hand and instrument knot-tying techniques are described and illustrated in wound care texts. Slide the blade of the scissors down the tail of the suture until the knot is reached. This technique prevents the scissors from cutting the knot itself and leaves a 3-mm tail, which protects the knot from unraveling. The index finger is placed on the side of the needle holder, where it guides placement of the needle. C, Hold the forceps in your nondominant hand as you would hold a pencil or a dart. Pull the suture across the wound to determine the correct level of dermal entry on the opposite side. Pass the needle downward through the dermis on the opposite side so that it exits at the bottom of the wound. B Start here If the wound has been undermined, the needle enters at the base of the flap and is passed upward through the dermis. C Pull the two tails of the suture in the same direction along the axis of the wound to appose the wound edges, and then tie the knot. Subcutaneous knots are "buried" at the bottom of the wound to prevent painful nodules beneath the epidermis and to keep the bulk of the foreign material away from the skin surface. Surface Closure the epidermis and the superficial layer of dermis are sutured in a single layer with nonabsorbable synthetic suture. If the edges of the wound are apposed after closure of the deeper layers, small 5-0 or 6-0 sutures can be used simply to match the epithelium on each side. Wounds with greater tension and separation should have skin stitches placed closer to each other and closer to the edge of the wound with consideration for an interrupted vertical mattress suture; layered closure is important in such wounds. When suturing the skin, right-handed operators should pass the needle from the right side of the wound to the left. The needle should be driven through tissue by flexing the wrist and supinating the forearm; the course taken by the needle should result in a curve identical to the curvature of the needle itself. The angle of exit for the needle should be the same as its angle of entrance so that an identical volume of tissue is contained within the stitch on each side of the wound. Once the needle exits the skin on the opposite side of the wound, regrasp it with the needle holder and advance it through the tissue; care should be taken to avoid crushing the point of the needle with the instrument. Forceps are designed for handling tissue and thus should not be used to grasp the needle tightly. Forceps can stabilize the needle by holding it within the tissue through which the needle has just passed. If the point of the needle becomes dull before all the attached thread has been used, the suture should be discarded. Complications Sutures act as foreign bodies in a wound, and any stitch may damage a blood vessel or strangulate tissue. Therefore, the clinician should use the smallest size and the least number of sutures that will adequately close the wound. Drive the needle tip downward and away from the cut edge into the subcutaneous layer. The needle tip is directed toward the opposite side at the same level by rolling the needle holder. This method incorporates more tissue within the stitch in the deeper layers of the wound than at the surface. As an alternative, if a small needle is used in thick skin or the distance across the wound is great, the needle can be removed from the first side, remounted on the needle holder, and advanced to the opposite side. The distance from each exit of the suture to the laceration is half the depth of the dermis. C, Correct number of stitches used for a wound under an average amount of tension. Rotate the wrist (pronate) so that the needle enters the skin perpendicularly, not at an angle, as the wrist supinates. If sutures are tied too tightly around the edges of the wound or if individual stitches are under excessive tension, blood supply to the wound may be compromised, thereby increasing the chance of infection. If the edges of a wound invert or if one edge rolls under the opposite side, a poorly formed, deep, noticeable scar will result. Excessive eversion that exposes the dermis on both sides will also result in a larger scar than if the edges of the skin are perfectly apposed, but inversion produces a more visible scar than eversion does. Because most scars undergo some flattening with contraction, optimal results are achieved when the epidermis is slightly everted without excessive suture tension. Wounds over mobile surfaces, such as the extensor surfaces of joints, should be everted. In other words, the stitch is wider at its deepest part and narrower at the surface. To accomplish eversion, lift and turn the edge of the wound outward with a skin hook or fine-toothed forceps before inserting the needle on each side.
Buy zyrtec 5 mg without prescription
B allergy treatment orlando fl generic 5 mg zyrtec fast delivery, Note the use of a stopcock on the syringe to allow complete drainage without repositioning the needle. Compression of the suprapatellar region by the operator or an assistant will facilitate complete aspiration. For the knee, a 60-ml syringe and an 18-gauge needle should be used to drain large effusions. Note that the red streaks of blood denote a traumatic tap rather than hemarthrosis. B, Acute gout of the ankle is common but can mimic an infected joint, an uncommon condition. Arthrocentesis was unsuccessful, but a previous history of gout and the clinical features allowed empirical treatment of gout. Normal fluid produces a good mucin clot and yields a positive "string sign" (see the next section). The uric acid level of joint fluid approaches that of serum, and the glucose concentration is normally at least 80% of that in serum. High leukocyte counts result in opacity, the degree of which generally correlates with the degree of elevated synovial fluid leukocytes. However, the degree of opacity cannot be used to reliably determine the synovial fluid leukocyte count and should not be used as a surrogate for laboratory cell count measurements. One can treat gout empirically with close follow-up to be certain that infection or coinfection is not present. C, the red, warm, swollen, and painful condition of the dorsum of the foot is a common finding with gout but may suggest cellulitis. The practitioner measures the length of the "string" formed by a falling drop of synovial fluid extruded from a syringe or stretched between the thumb and the index finger of a gloved hand. If viscosity is reduced, as with inflammatory conditions, synovial fluid forms a shorter string or falls in drops. Mucin Clot Test the mucin clot test also corresponds to viscosity and inflammation. The greater the inflammatory response, the poorer the mucin clot and the lower the viscosity. String Sign Viscosity correlates with the concentration of hyaluronate in synovial fluid. Index finger Continuous string of synovial fluid 5-10 cm Serology Though available, most serologic tests are not likely to be useful in the emergency setting. Gas-liquid chromatography, a rapid and sensitive method for detection of short-chain fatty acids, may complement the currently available methods used to diagnose septic arthritis. Other immunologic markers such as complement, rheumatoid factor, and antinuclear antibodies have little diagnostic value in the acute setting but may be useful to the clinician providing follow-up care when compared with serum levels. String of synovial fluid Thumb A Fluid Processing Proper collection of joint fluid is essential for examination and testing. Tests for viscosity, serology, and chemistries are done on fluid collected in a red-topped (clot) tube, whereas cytology samples are collected in tubes with an anticoagulant (purple top). One should always transfer the fluid for crystal examination into a tube with liquid heparin (green top) because undissolved heparin crystals from powdered anticoagulant tubes can be seen on microscopy. Early transfer of synovial fluid to this green-topped tube is essential to prevent clotting. Culture requirements for transport and processing should be accessed before the procedure to ensure appropriate processing or plating of specimens. Mucin clots are produced by mixing one part joint fluid with four parts 2% acetic acid. A good clot indicates a high degree of polymerization and correlates with normal high viscosity. Polarizing Microscope No synovial fluid analysis is complete until the fluid has been examined for crystals under a polarizing light microscope. The polarizing microscope used for crystal identification differs from the ordinary light microscope in that it contains two identical polarizing prisms or filters. The other filter is called the analyzer and is inserted at some point above the objective. Polarization Physics the polarizer allows passage of light in only one specific orientation. The analyzer acts as a crossed filter by removing all light in the light path unless the material being examined rotates the beam from the polarizer into the plane of the analyzer. The compensator functions by imparting color of a certain wavelength (red at approximately 550 nm). Microscopic Analysis When examining crystals under polarized microscopy, the technician orients crystals on a stage according to two axes, referred to as x and z. If the long axis of the crystals is blue when parallel to the z-axis and yellow when perpendicular to it, it is calcium pyrophosphate and termed positively birefringent. If the long axis of the crystal is yellow when parallel to the z-axis and blue when perpendicular to it, it is monosodium urate and termed negatively birefringent. Cholesterol crystals are sometimes seen and are large, very bright square or rectangular plates with broken corners. Note that rare cases of uric acid spherulites in gouty synovia have been reported. B, A fibular head fracture (arrow) was initially thought to be responsible for a large knee hemarthrosis, but anatomically it is extraarticular. C, On this view one might appreciate the radiolucent lines suggestive of a lateral tibial plateau fracture (arrows), but such subtle findings are easily missed, as was the case with this patient. Therapeutic arthrocentesis was performed to alleviate pain, and an obvious lipohemarthrosis was noted. D, Magnetic resonance imaging demonstrates an obvious lateral tibial plateau fracture (arrows), which was searched for only after lipohemarthrosis was noted. Treatment and interventions may be altered significantly if a joint space has been traumatically violated. Plain radiographs may demonstrate air in the joint, which clinches the diagnosis, but in questionable cases the diagnostic approach includes injection arthrograms. Historically, these were performed by injecting methylene blue into the joint in question and assessing leakage from the joint. A plain radiograph may demonstrate air in the joint space, but a saline arthrogram may also be used. Methylene blue alone is not generally required and it can cause an inflammatory reaction and obscure arthroscopy. Note that a bag of intravenous saline (or additional vials of saline) introduced into the syringe may be required to provide enough saline to distend the joint properly. A positive test is egress of saline into the original wound or slow loss of saline from the joint. The sensitivity of the test in detecting small traumatic joint injuries is proportional to the volume injected. Specifically, for knee injuries, injecting 50 ml of saline was 46% sensitive and injecting 100 ml, 75% sensitive; to achieve 95% sensitivity required an average of 194 ml of saline. This is performed in a static position but, if negative, also with some gentle passive movement of the joint. Visible leakage of fluid into the laceration confirms the diagnosis of joint space violation. A negative test is defined as absence of evidence of leakage after an appropriate amount of saline has been injected. A slow loss of fluid may indicate a small insult to the joint, and saline can be left in the joint for a few minutes to observe for this. This is generally performed by leaving the original needle in place with a closed stopcock attached, which is then used to aspirate the saline in the joint. In addition, some temporary patient discomfort because of joint distention should be assumed.
Cheap generic zyrtec canada
Procedure Before stapling allergy forecast vermont order 5 mg zyrtec free shipping, sometimes it is necessary to place deep, absorbable sutures to close deep fascia and reduce tension in the superficial fascia and dermal layers. To facilitate the stapling process, the edges of the wound should be everted, preferably by a second operator. The assistant precedes the operator along the wound and everts the edges of the wound with forceps or pinches the skin with the thumb and forefinger. Stapling flattened wound edges may place the staple precisely but results in inversion of the wound. Once the edges are held in eversion, the staple points are gently placed across the wound. Skin staples may be used for relatively linear lacerations with straight, sharp edges on the extremity, trunk, or scalp. Their main disadvantage is loss of the better cosmetic effect afforded by meticulous suture closure. Failure to evert the wound edges is a common error that may cause an unacceptable result. Excessive pressure created by placing the staple too deep causes wound edge ischemia, as well as pain on removal. To remove the staple, place the lower jaw of the remover under the crossbar of the staple. Squeeze the handle gently, and the upper jaw will compress the staple and allow it to exit the skin. Failure to align the center of the staple device directly over the center of the laceration is a common cause of a less than ideal staple closure. When the stapler handle or trigger is squeezed, the staple is advanced automatically into the wound and bent to the proper configuration. The operator should not press too hard on the skin surface to prevent placing the staple too deeply and causing ischemia within the staple loop. When placed properly, the crossbar of the staple is elevated a few millimeters above the surface of the skin. A sufficient number of staples should be placed to provide proper apposition of the edges of the wound along its entire length. Removal of staples requires a special instrument made available by each manufacturer of stapling devices. The lower jaw of the staple remover is placed under the crossbar, and the handle is squeezed. This action compresses the crossbar and bends the staple outward, thereby releasing the points of the staple from the skin. If well-instructed, patients can remove their own staples with the removal device. The interval between staple application and removal is the same as that for standard suture placement and removal. Complications Patient acceptance, comfort, and rates of wound infection and dehiscence are similar with staple-closed wounds and sutured wounds. However, removal of staples can be somewhat more uncomfortable than removal of sutures. A common error during insertion of staples is failure to evert the edges of the skin before stapling. Eversion may be accomplished with forceps or by pinching the skin with the thumb and index finger, a procedure that requires some practice. Another common error is to fail to align the middle of the staple exactly in the midline of the wound. The edges of the wound were not everted, staples were not in the midline, sections of the skin overlapped significantly, poor hemostasis was obtained, and the galea could not be closed by the superficial staples. B, Three days later during inspection of the wound, the staples were removed and C, the laceration was closed with 3-0 interrupted nylon sutures. The clinician should attempt to obtain a cosmetic closure on all scalp lacerations because as patients lose their hair, a previously hidden, unsightly scar emerges. In general, staples should not be used to close full-thickness scalp lacerations, especially wounds that are actively bleeding. D, Sloppy stapling on an extremity with inversion rather than eversion of the edges of the wound. Wound stapling achieves results that are generally comparable to those of sutures for the closure of traumatic, linear lacerations in noncosmetic areas, such as the scalp, trunk, and extremities. Wound stapling does not differ significantly from suturing in terms of cost, infection rates, wound healing, and patient acceptance, but cosmesis may suffer, especially if the staples are left in too long. The mechanical performance of disposable needle holders distributed by different surgical instrument companies varies considerably. Instruments covered with coagulated blood can be cleansed with hydrogen peroxide, rinsed with sterile saline or water, and then used for suturing. There are no definitive standards on which to base the use of suture material for a particular wound or site. Some sutures are made of a single filament (monofilament); others consist of multiple fibers braided together (Table 35. Conversely, sutures with a high coefficient of friction have better knot-holding capacity but are difficult to slide through tissue. Smooth sutures will loosen after the first throw of a knot is made, and thus a second throw is needed to secure the first in place. Rougher, multifilament types of suture make it more difficult to tighten a knot further after the first throw is made. Multifilament sutures have the best handling characteristics of all sutures, whereas steel sutures have the worst. In terms of performance and handling, significant improvements have been made in the newer absorbable sutures. The frictional drag of these coated sutures as they are pulled through tissue is less than that of uncoated multifilament materials, and resetting of knots after the initial throw is much easier. This characteristic allows retightening of a ligature without knotting or breakage and with smooth, even adjustment of suture line tension in running subcuticular stitches. Some nonabsorbable monofilament sutures are coated with polytetrafluoroethylene (Teflon) or silicone to reduce their friction. This coating improves the handling characteristics of these monofilaments but results in poorer knot security. Modified with permission from Hollander J, Singer A: Laceration management, Ann Emerg Med 34:351, 1999. Plain gut may be digested by white blood cell lysozymes in 10 to 40 days; chromic gut will last 15 to 60 days. Remnants of both types of suture, however, have been seen in wounds more than 2 years after placement. Braided synthetic absorbable sutures lose nearly all their strength after approximately 21 days. Catgut is stronger than the soft tissue of a wound for no more than 7 days; chromic catgut, Dexon, and Vicryl are stronger for 10 to 21 days; and nylon, wire, and silk are stronger for 20 to 30 days. Even the least reactive suture impairs the ability of the wound to resist infection. Among absorbable sutures, polyglycolic acid and polyglactin sutures are the least reactive, followed by chromic gut. Absorbable polyglycolic acid sutures are less reactive than those made of nonabsorbable silk. The infection rate in experimentally contaminated wounds closed with polyglycolic acid sutures is lower than the rate when gut sutures are used.
5mg zyrtec for sale
After cleaning allergy symptoms jaw pain discount zyrtec, suture the avulsed nail in place or secure it with wound closure tape or tissue glue. If only the distal portion of the nail has been avulsed, it can still be used as a temporary splint or "dressing" to protect and maintain the integrity of the underlying nail bed. The nail is tightly adherent to the nail bed, so it is not removed but simply replaced under the eponychium to its former position. C, A saw-induced laceration of the fingertip with an open fracture, nail bed laceration, and skin laceration. D, Only part of the nail was removed and the nail bed repaired through the window. Such injuries usually heal well with attention to detail, and infection is unusual despite the open fracture. E, Because this avulsed nail is unstable and subungual bleeding is present, the nail can be removed and the nail bed inspected. Any large nail bed laceration should be repaired meticulously with absorbable suture (6-0). After repair of the nail bed, a drainage hole is placed in the nail, and the nail is replaced under the eponychium (cuticle) and fixed in place with sutures that incorporate the nail edge and the skin bilaterally. In 2 to 3 weeks, the new nail will begin to push out the old nail (usually growing under it while maintaining the eponychium), and the old nail is removed. Although crush injury to the nail bed is probably responsible for this deformity, repair of the nail bed might have minimized the resultant deformity. A tourniquet is often necessary to maintain a bloodless field during tissue adhesive application. A, Fine, absorbable sutures are used to repair the nail bed under a bloodless field provided by a finger tourniquet. The avulsed nail (trimmed at the base) or a gauze pack is gently placed between the matrix and the eponychium for 2 to 3 weeks to prevent scar formation. B, If the original nail is replaced (the best option), it may be sutured or taped in place. Repair of a distal finger laceration involving the nail and the If the nail matrix is replaced quickly and atraumatically, the nail onychial fold. In this case, the nail is still adherent to the nail may act as a free graft and grow normally. Because the nail was macerated and unable to be replaced, gauze is used to maintain the eponychial space for 2 to 3 weeks. A small piece of gauze is placed with forceps to gently pack open the space to prevent scar formation. If the proximal portion of the nail is not replaced, either of two complications may result: (1) longitudinal scar bands may form between the proximal nail fold and the germinal matrix and cause a permanent split or deformity of the nail, or (2) the space between the proximal nail fold and the germinal matrix of the nail bed may be obliterated within a few days. The proximal portion of the traumatized nail often needs to be trimmed so that it will fit more easily into the nail fold. A replaced nail may grow normally and act as a free graft, but it is often dislodged by a new nail. If the germinal matrix of the nail bed is avulsed but intact, reimplant the nail with a 5-0 or 6-0 absorbable suture using a mattress stitch. A fingertip avulsion that involves the germinal matrix or an isolated nail bed avulsion should not be allowed to heal on its own. If the exposed germinal matrix is left open to granulate, it will form scar tissue that could produce a distorted and sensitive digit. Two small wedges are cut into the distal aspect of the nail and the nail is placed under the eponychial fold. A 4-0 (5-0 in children) absorbable or nonabsorbable suture is placed distal-to-proximal on one side of the paronychium. Suture is slid through the wedges of the distal nail, placed distal-to-proximal in the opposite paronychium, and then tied, resulting in a figure-of-eight pattern. The distal entry point is about the midpoint of the exposed nail plate and may be used even if the nail is only partially intact. At that time, remove and replace any nonadherent material that was inserted under the proximal nail fold, and assess the wound for infection. The use of absorbable suture for nail bed repair makes suture removal unnecessary. Sutures that were used to reattach the nail are removed in 2 weeks, and the old nail is allowed to fall off as the new nail grows. Advise all patients with nail injuries of a possible cosmetic defect in the new nail that may occur regardless of the repair technique. Drains in Sutured Wounds Drains are used primarily to keep wounds open for drainage of existing purulence or blood that may otherwise collect in the wound. Drains in uninfected wounds may wick surface bacteria into the wound and impair resistance of the wound to infection. Drains should not serve as substitutes for other methods of achieving hemostasis in traumatic wounds. Removal of a Nail If a partially avulsed or intact nail requires removal (Video 35. The nail is usually firmly attached to the bed but can be separated by advancing and opening small scissors in the plane between the nail and the bed. Tuft Fractures Lacerations Over Joints Lacerations over joints may enter the joint itself or injure adjacent tendons or muscle groups. A plain radiograph of a large joint such as the knee may demonstrate air within the joint, which is evidence of joint penetration. Fingertip Amputations Treatment of fingertip amputations has undergone evolution from complicated grafts and flaps to nonsurgical follow-up and primary healing. If bone is not Once the nail bed has been lacerated, a tuft fracture is considered an open fracture. Antibiotics are not used after nail trephination, even in the presence of a tuft fracture. Infection is rare, but antibiotics may be considered for significant crush or highly contaminated injuries. C, Fingernail substitute trimmed to fit in the nail bed and to provide the nail bed protection while healing. From Rezaie S: Trick of the trade: nail bed repair with tissue adhesive glue, Acad Life Emerg Med 2014. A radiograph to look for air in the joint or a saline arthrogram (see Chapter 53) should be performed. B, Air in the joint space (arrows) on a plain radiograph proved joint space violation. Nail Removal 1 2 To remove a fingernail or toenail atraumatically, the blades of iris Once the nail is removed, repair any nail bed lacerations with scissors are held parallel to the nail bed to avoid lacerating the absorbable suture. The closed blades are slowly advanced in the plane between the nail and the nail bed and then gently spread to loosen the nail. The scissors are advanced and spread in stages until the base of the nail is reached and the entire nail is loose. Approaches vary widely, and referral can be made in a few days if not immediately available. C, Although it is tempting to replace the amputated tip, many would allow this wound to heal spontaneously, albeit slowly (8 to 12 weeks), and not perform skin grafts or flaps. Multiple perforating vessels exist and are interconnected at the periphery of their vascular territory. When some of these vessels are cut, the blood supply can be replaced with nearby perforating vessels, and then tissue necrosis does not occur.
Generic 5mg zyrtec
Anatomy Each toe is supplied by two dorsal and two volar nerves allergy medicine in first trimester generic zyrtec 10mg on-line, which are branches of the major nerves of the ankle. The dorsal digital nerves are the terminal branches of the deep and superficial peroneal nerves. The location of the nerves in relation to the bones varies with the site of the foot. In the proximal part of the foot, the nerves run with the tendons and are not in close relationship with the bones. Technique the digital nerves can be blocked at the metatarsals, interdigital web spaces, or toes. The bones of the foot can be palpated easily from the dorsum and are used as the landmarks for estimating the location of the nerves. In the toes, the position of the nerves is more consistent; however, minimal subcutaneous tissue space is available for the injected solution. At the web space, the nerves are located in close relationship to the bone, and ample space is available for injecting the anesthetic; hence, for most procedures the web space is the preferred site for a digital nerve block. All four nerves supplying each toe are usually blocked because of their sensory overlap. Perform the block from the dorsal surface, where the skin is thinner and less sensitive. Advance the needle until the volar skin tents slightly, and inject 2 mL of anesthetic as the needle is withdrawn. Without removing it, redirect the needle in a different volar direction, and repeat the procedure. Deposit a total of 5 mL of anesthetic in a fanlike pattern in each metatarsal space. Again, because of sensory overlap, two or more spaces need to be anesthetized for each toe to be blocked. For a web space block, select a site on the dorsum just proximal to the base of the toe. This serves to block the dorsal nerve and minimize pain at the needle insertion site. Advance the needle just lateral to the bone toward the sole until the needle tents the volar skin slightly. In this manner, two columns of anesthetic are placed on each side of the toe in the area through which the four digital nerves run. For blocks done in the toe itself, the procedure is the same, but smaller amounts of anesthetic. Alternative techniques using a single injection site, as described for the finger, can be performed. Complications and Precautions Complications of lower extremity nerve blocks are similar to those associated with nerve blocks performed in the upper extremity and include intravascular injection, local anesthetic toxicity, nerve trauma, hematoma formation, and failure of the block. Ischemic complications can be avoided by paying attention to changes in the skin during the injection. If the skin blanches, halt the procedure and reevaluate the position of the needle and the amount and content of the injected solution. A toward the sole until the needle slightly total of 2 to 4 mL of anesthetic is typically tents the volar skin. Redirect the needle (without completely removing it) across the dorsal surface of the toe. Inject anesthetic on the dorsal surface of the opposite side of the toe, and then remove the needle. Insert the needle through the newly anesthetized region, and block the dorsal and volar nerves on this side of the toe. Nerve stimulators may be used to identify larger nerves and ensure proper placement of anesthetics. However, these techniques are not infallible and improper placement of anesthetic may result. Additionally, some nerve blocks, such as the scalene block, may be avoided because of concern regarding adjacent anatomic structures. Use of ultrasound allows the clinician to identify the nerve in question, as well as to directly guide the application of anesthetic. Furthermore, nearby structures such as arteries or veins can be identified and avoided, thereby offering the operator greater confidence in performing more advanced blocks. Despite a limited number of randomized controlled trials, preliminary evidence seems to support the use of ultrasound, especially with regard to patient safety. Sterile technique is not typically required for peripheral nerve blocks but should be used when accessing larger, more central structures such as the femoral nerve. Peripheral nerves have a characteristic appearance when viewed by ultrasound and are usually easily identified, especially in the transverse orientation. They are hyperechoic (white) in appearance and are generally round or oval, although some may also appear more triangular. In larger nerves, the individual fascicles may be visible, especially when viewed with higher frequency. Nerve trunks (such as those used for scalene blocks) appear as rounded objects with a hypoechoic (darker gray) center. They may resemble blood vessels so take care to ensure that they are distinguished. This can be done by applying color flow Doppler and noting the absence of blood flow. Peripheral nerves are characterized by a brightly echogenic (white) texture and appear slightly fibrillar. Use of this technique will allow the sonographer to directly follow the course of the needle as it travels toward the nerve. Once the nerve has been visualized, the "in-plane" technique is often the most useful to guide the needle to the selected area. Place the transducer in the transverse or slightly oblique plane relative to the nerve. Adjust the transducer so that the nerve is further away from the entry point of the needle. This will ensure that when the needle is inserted under ultrasound guidance, it can be "followed" as it advances toward the nerve in question. Once the image has been obtained, introduce the needle from the end of the transducer. Once the tip of the needle is seen adjacent to the nerve, inject anesthetic under direct ultrasound guidance. The best results are usually obtained by injecting anesthetic in a pattern that surrounds the nerve in a concentric manner. Nerve trunks appear similar to vascular structures, with a hypoechoic (light gray) area surrounded by a hyperechoic (white) wall. The needle can also be inserted from the midpoint of the transducer, although this technique may cause more difficulty in following the tip of the needle. Detailed descriptions of the anatomy and technique of the individual nerve blocks can be found throughout this chapter. However, it is important to discuss the nerve blocks typically performed under ultrasound guidance because the landmarks differ slightly. Interscalene Block the interscalene nerve blocks focuses on the trunks of the brachial plexus, specifically C5, C6, and C7. Blocking these trunks will provide anesthesia to most of the shoulder and upper extremity and spare the medial aspects of the arm and hand (these are innervated by the C8 and T1 nerve roots). This block is ideal for shoulder dislocations or complex lacerations of the upper extremity. The trunks can be found grouped together in the neck and are typically easily identified with ultrasound. Because a number of critical structures are located near these trunks, using ultrasound to guide the injection will offer the physician increased confidence in the procedure, as well as increased success in the block.
